
XS3 OWNERS Page.
SUPPORT AND UPGRADES ARE STILL AVAILABLE FOR XS3 OWNERS.
Upon Graves purchase of the XS Product, designs,
and rights, I left the faceting machine business As part of the legal Agreement. However, I support the existing 80+
original XS3 machines.
The Following Upgrades and accessories are available, to XS3 owners:
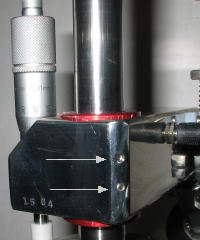
1: Micrometer head adapter for the very early machines with a simple knurled Screw for angle fine
adjust.They are made of metal, as experience has shown the BW Meter is superfluous in a .01° machine.
These
do fit the current Graves 5XL. Made of metal, they have less elasticity than the insulator-type OEM that allowed the
use of a BW meter.
2: Jitter-free rock solid display upgrade. This solves the AC Line transient issues for some users in remote locations
at the end of long transmission lines. (Or a neighbor who has a BIG Welder.)
Disassembly and reassembly and
recalibration required. About one week turnaround.
XS3 COMPATIBLE MACHINE BASES!
Been using an old base
on your XS3 all these years? Now you can get this base, put your old
machine on its original base, dump it on EBay, and essentially have
this silent direct drive base for free!
THE BASE!
Adjustments:
On units after #13, the mast bearing preload is adjustable. The mast should slide easily, but without slop.
If one screw is tightened more than the other, the bearing can be forced into a shallow cone, and the assembly will
rock. Then, the bearing can appear loose in its bore, but the sliding on the shaft will seem tight enough. You
should rarely, if ever, have to touch these adjustments!
For those who choose the 1" diameter upgrade kit,
changing the bearing is very easy. Simply back out the two setscrews, slide out the bearing, push in the replacement,
and engage the setscrews and adjust as usual.
The adjustable bearing was chosen for units after #14 because the
ball bearings previously used required close tolerances on the purchased ground and polished rod- Many units had to be
purchased and hand-selected for fit. Having worked on many English cars who required "Selective assembly for a
double-thumb press fit on the gudgeon pin" I came to the conclusion that this is no damned way to build something!!!
:-)
HOWEVER: If someone ever decides they do not like to play with adjustments, or have difficulty doing so, write
me and I will swap out the bearing with the non-adjustable type! They can be changed in a minute with an Allen wrench.
Cheater Preload Adjustments.
Cheater, Cheater, Cheater.
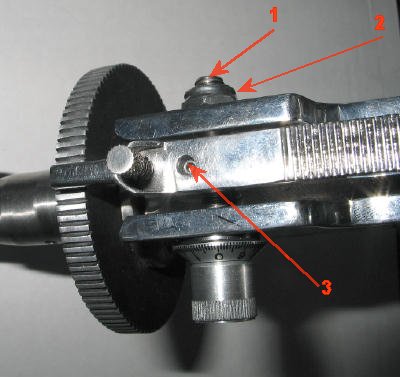
Thrust Preload.
1: Alan wrench socket.
2: 7/16 Hex Nut
3: Thread
Friction Preload
There must be slight friction on the cheater shaft thread, because the shaft moves with the motion
of the index latch. The cheater knob should be slightly difficult to turn. If it drifts in use, indexing will be
unreliable. (3) is a nylon-tipped setscrew that acts as a brake on the threads and may be adjusted if needed.
Cross
shaft preload adjustment will probably never need to be done, as the preload is on ball bearings. It is easily
accomplished with an allen wrench inserted into the socket (1) to immobilize the shaft, while the adjustment is made
by turning the 7/16 Nylock nut (2).
The critical test is, with the latch fully engaged in an index gear tooth, when
applying back-and-forth torque to the index gear, there should be NO detectable play or slop. Beware: People have
mentioned that once in a while, the freewheeling latch can wiggle or move and prevent full engagment of the index
latch, resulting in sloppy indexing! Be sure that for most faceting it is fully retracted.
*THERE SHOULD
NEVER BE ANY SLOP OR LOOSENESS ON AN XS3*
Electronic Calibration
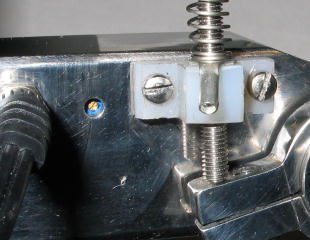
Notice in the above picture the Delrin insulator. Some later units, #33 onward, had
a black nylon one. Nylon was chosen for its better self-locking feature to the threads of the adjuster. However, the
Nylon is "springy"-Too elastic or springy for the job as a true hard stop. If you have one of these and notice poor BW
performance or relationship to the hardstop setpoint, e-mail me with your address and I will immediately send you the
latest upgrade in G10 epoxy/glass.
The units are shipped in calibration, and tested at 0,30°,45°,60°, and 90°.
(Due to construction internal details of the sensor, at true 0°, the meter should read "00.04" to "00.07"
.
Later units are now locked permanently with a drilled in place dowel pin.Unless the unit was subjected to severe
shock and vibration in transit, there should never be any need to touch this adjustment
This is a sensitive
adjustment.
MICROMETER TENSION ADJUSTMENT:
The micrometer must not rotate as the head
is swung in and out to inspect a stone, or the height adjustment might change. Adjusment of the micrometer head screw
friction is simple:
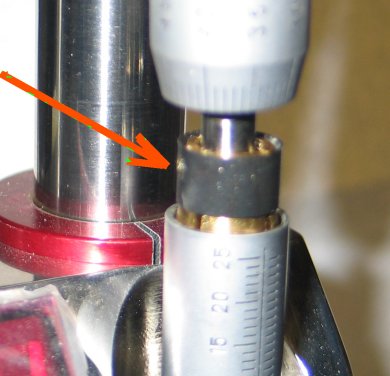
Unscrew the micrometer spindle to expose the adjusting nut.
Depending on the micrometer, the adjustment nut may have notches or holes to engage the spanner wrench (Supplied with
the machine).
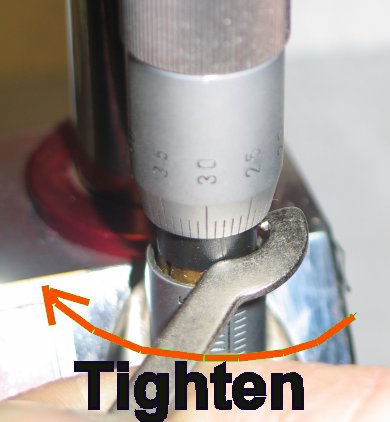
Tighten the nut a small amount, perhaps 1/8 turn and screww in the
micrometer head and see how you like the stiffness. Repeat as needed until the micrometer head requires a slight
effort to rotate it.
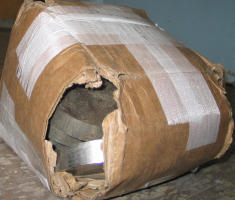
SHIPPING NOTES
1: Never ship the unit with the coarse angle clamp locked.
The XS3 is a rugged machine, but I cannot even get METAL STOCK in without damage! Block the head with a piece of
semirigid foam at about the 10° position.
Here is how it really works: Every
time UPS, Fedex, or the PO raises its rates, the service gets worse. Count on it.
