Assembly and Calibration.
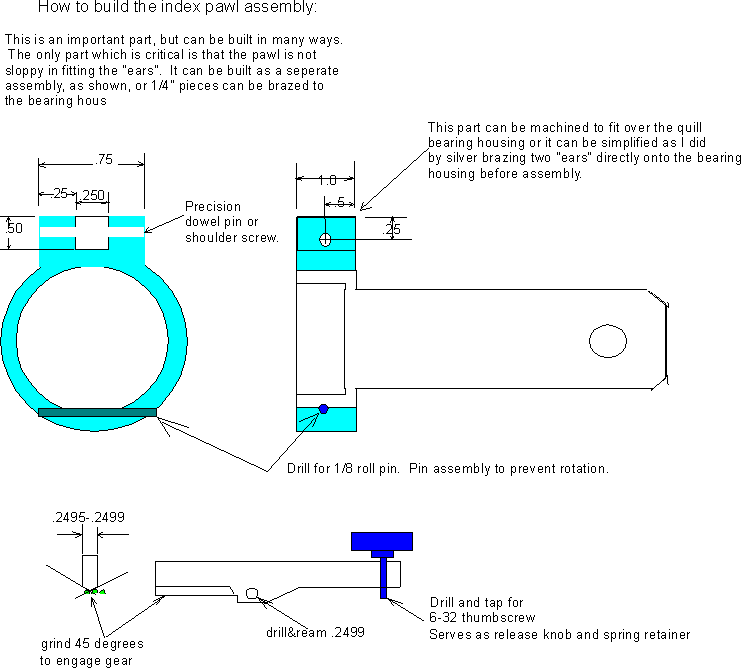
By now, all the critical major parts are done. The indexing pawl must be made, but this is straightforward. After assembly, with the index gear in place, clamp the pawl lever down so the gear is freewheeling. The a small hole (1/8") can be drilled. When freewheeling mode is needed, such as preforming the cone for a pavilion or preforming the circle for a round brilliant, a small pin can be inserted in the hole, locking the pawl out of engagement.
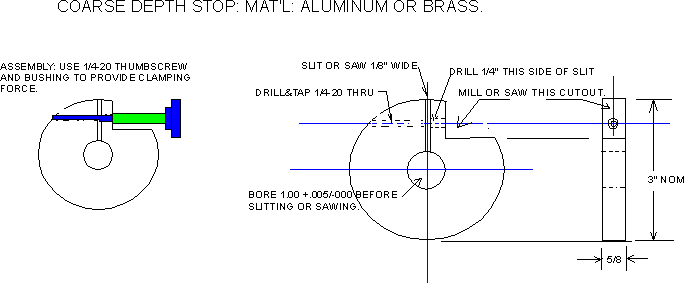
Coarse depth stop: This unit clamps onto the mast shaft. It does not mar the finish of the mast shaft, as a set screw would. The facet head/mast follower assembly sits on this part, and the micrometer spindle tip rests on the top surface. This allows rapid height changes, from girdle cutting to table cutting, while the micrometer head allows critical settings. NOTE: The 1" center bore must be perpendicular to the top and bottom surfaces.
The angle stop clamp is a simple locking device which is installed onto the trunnion (angle) shaft. 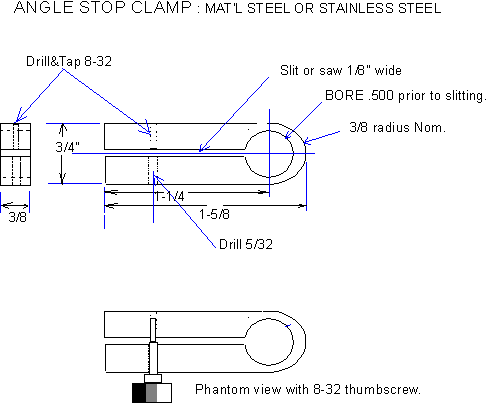
When the thumbscrew is tightened, it then rests on the 1/4" dowel pin, acting as a "hard" stop for the angle. So first, the quill assembly with the mounted dopped stone is allowed to hang down. The angle is set with the protractor with the screw slightly loosened. When the assembly is rotated to the correct angle when resting on the dowel pin stop, the screw is tightened. Then the height is set coarsely with the above mast stop, and the head assembly slowly lowered with the micrometer spindle until the stone contacts the lap. Now the starting height number from the micrometer stop may be noted, and cutting and polishing can begin.
CALIBRATION.
Below is a simple, but very accurate method of calibrating the machine's angle protractor. With a good flat lap, place two accurately surface ground gage blocks or "V" blocks IDENTICAL IN HEIGHT on the lap as shown. Place in the dop holder a perfectly straight piece of centerless ground rod. With the gear locked in freewheeling mode, rotate the quill and observe if there is any runout. Using a combination of the height micrometer and the angle stop, adjust the faceting head's angle and height the so that light is just visible between the rod and both gage blocks. This is a very accurate method, far exceeding the resolution of any protractor or vernier. When uniform height is acheived on both blocks, lock the protractor in place reading exactly 90 degrees. Using a 1/16 tungsten carbide drill bit, pin the protractor at this value with a 1/16 roll pin.
This test may be repeated on the machine's baseplate. The reason for using the lap as a datum is simply because that is where the stone will be cut. If you mounted the motor perfectly, the protractor will repeat the values at both surfaces, the lap, or the baseplate.

The rest is up to you. Buy books, join a local club and get instruction, teach yourself, and dont miss the Faceters' Digest Mailing List, a daily treasure trove of tips, hints, and differing opinions! Write nndewbre@ix.netcom.com and ask to subscribe!

Back to the Machine Page.
Last Revised 11-09-97. Date of first publication: December 17, 1996: Single use copyright granted to Eclectic Lapidary Magazine for online article. IP licence granted to end user for the manufacture of one unit for personal use. This article was produced without compensation, to contribute to an enjoyable pastime.
